MRI-guided breast interventions
Images


Breast MRI has been well established as the most sensitive modality in breast imaging.1 However, it suffers from limited specificity, with known overlap between the signal intensity and enhancement characteristics of benign and malignant abnormalities, often requiring tissue sampling for definitive diagnosis.2 Second-look sonography is defined as a targeted ultrasound examination that uses lesion features such as size, morphology and location gathered from the concurrent MRI examination to evaluate for a correlative ultrasound lesion. If the MRI-detected lesion can be seen with targeted sonography, biopsy can be performed under ultrasound guidance.3,4 Although the likelihood of a lesion being malignant has been shown to be higher if it demonstrates a sonographic correlate, reported lesion-detection rates with second-look sonography vary in the literature.5,6 It is important to remember that the lack of a sonographic correlate does not exclude malignancy.6
According to the American College of Radiology (ACR) practice guidelines, MRI-guided breast biopsy is warranted for suspicious lesions, or lesions highly suggestive of malignancy (BI-RADS 4 and 5) that are mammographically and sonographically occult or seen with certainty only on breast MRI. MRI-guided biopsy offers a minimally invasive alternative to surgical excision or open surgical biopsy. Other advantages include reduced morbidity, better cosmetic results and decreased scarring, with comparable accuracy. In addition, percutaneous biopsies are more cost effective, with less time lost from the patient’s normal activities.7
MRI-guided needle localizations provide safe and technically feasible presurgical needle localization, particularly in cases where disease extent is either not demonstrated or larger than demonstrated by sonography and mammography, and in cases of biopsy marking clip migration or lack of clip deployment at MRI-guided biopsy. If a lesion is not technically amenable to MRI biopsy due to location or size of the breast, MRI-guided needle localization may be a viable alternative.7
As with other interventional procedures, radiologist familiarity with the preprocedural, procedural and postprocedural protocols is key to successful performance. This article provides a step-by-step guide to effectively performing safe and efficient MRI-guided procedures. Per ACR guidelines, if an institution performs breast MRI but does not offer MRI-guided interventional procedures, an arrangement is needed with another facility to perform the procedures without repeating the diagnostic MRI.7
Preparation, positioning and protocols
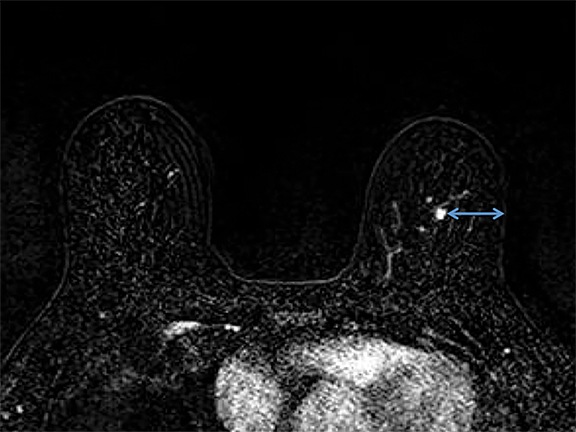
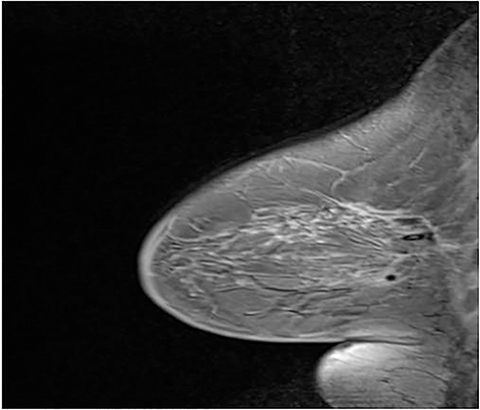
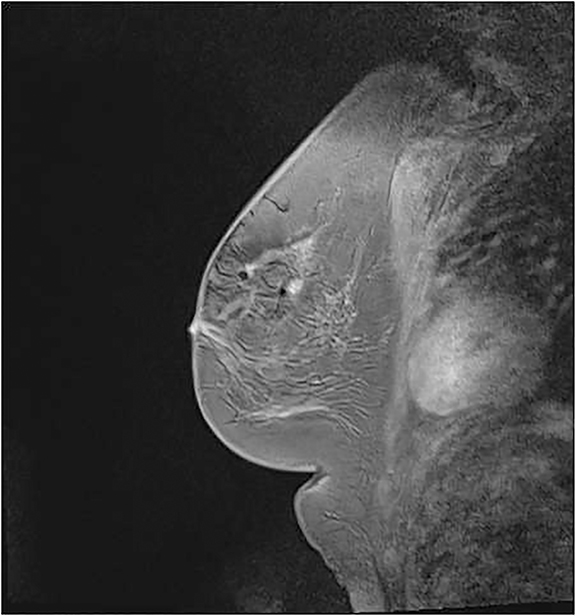
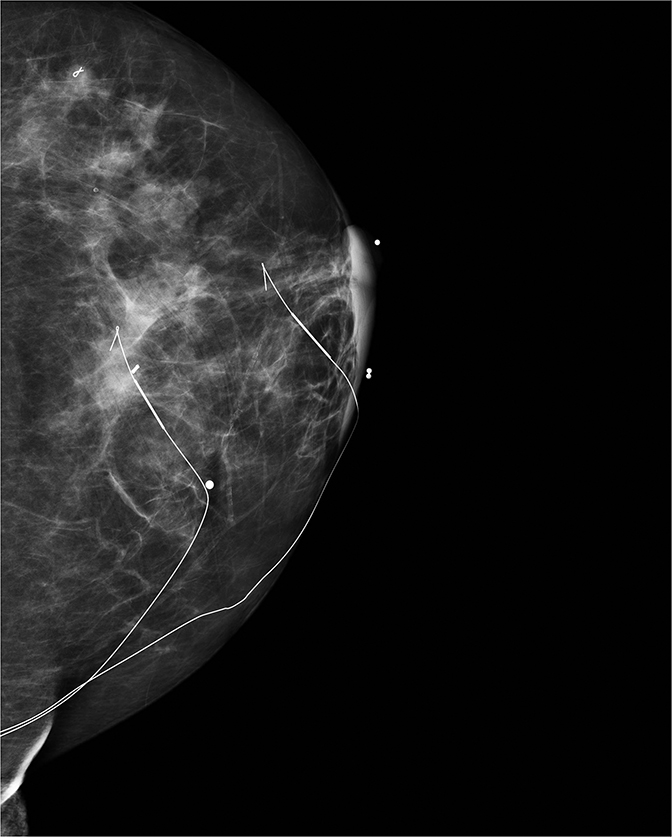
It is imperative that the radiologist review the diagnostic MRI prior to the procedure. Breast positioning within the coil during the diagnostic examination should be noted, as it affects the perceived lesion location. The precontrast, T1-weighted images should be studied to determine whether the lesion can be seen prior to contrast administration. If not, anatomic landmarks can help determine lesion accessibility. Several measurements should be acquired before the procedure, including depth of the lesion and its distance from the nipple, both superior or inferior, and medial or lateral. The decision to access medially or laterally depends on how much tissue would be traversed. The best option is the shortest distance to the lesion; however, this is sometimes not possible due to anatomic barriers (Figure 1). Prior images should also be reviewed to determine if the patient has other biopsy clips present.
MRI-guided biopsies can be daunting procedures for patients; clear communication is necessary to help ease anxiety. A patient with known claustrophobia may benefit from an anxiolytic prescribed by the referring physician. It is also vital to stress the importance of minimizing motion to avoid repositioning and a longer procedural time.8 Obtaining informed consent involves asking general biopsy questions, such as prior reactions to lidocaine, a history of bleeding disorders and/or anticoagulation, as well as the standard risks including pain, bruising, bleeding and infection, and the possibility of scarring. The patient should be informed of the need for biopsy-marking clip placement and a post-biopsy mammogram. There are questions and protocols specific to MRI that should be addressed, including confirming the patient is not breastfeeding or pregnant, evaluating for renal issues by checking the glomerular filtration rate before image acquisition, ensuring MRI clearance (eg, absence of metallic implants, aneurysm clip/pacemakers) and no prior history of gadolinium allergy. The patient should be made aware of the possibilities that the target lesion may not be visualized or may be inaccessible, as in the setting of lesions in close proximity to the pectoralis muscle or near the nipple or skin.8
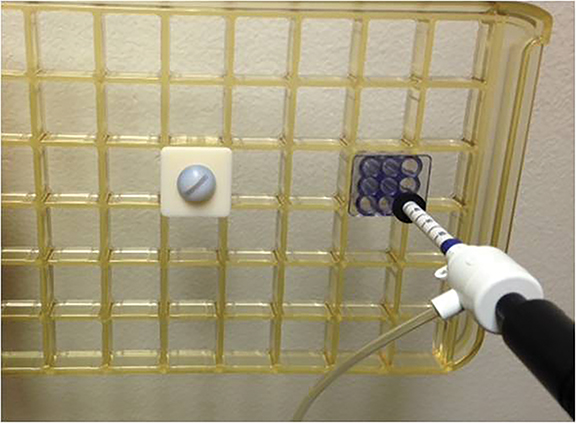
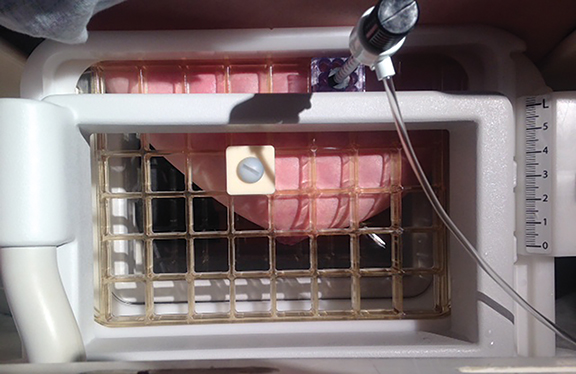
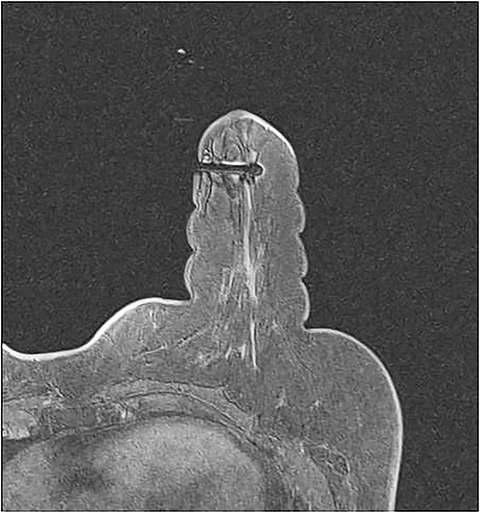
After obtaining informed consent and intravenous access, the patient should be offered earplugs and placed in the prone position. The affected breast or both breasts, in the case of bilateral biopsies, are positioned within the dedicated breast coil. The breast(s) are stabilized with moderate compression and a positioning device that attaches to the coil.9 Either a grid system or a pillar-and-post system can be used (Figure 2). We will focus on the grid system, as this is routinely used at our institution. The grid system utilizes a matrix of uniform squares. Determining the level of compression needed is a balancing act between patient comfort and immobility. Compression minimizes motion; however, too much can prevent contrast flow and limit lesion visibility. Snow-plowing, which occurs when the targeted lesion and the more proximal tissues are displaced rather than dissected, as well as skin tenting, are less likely with appropriate compression.10
Optimal positioning within the breast coil is key to success. Posteriorly and medially located lesions can be challenging. A pad on the biopsy table offers more comfort; however, it can limit access to more posterior tissue. Arm positioning is also an important consideration. The arms-down position allows more posterior tissue to be included in the coil while the arms-up position removes the pectoralis from the grid, making lesions close to the muscle more easily accessible.8 Prone, oblique positioning may help with access to the posterior tissues and axillary tail. For medially located lesions, lateral access from same breast may be easier for access. The breast can be rolled to place the lesion in a more lateral position. Placing the grid on both sides can be helpful if the feasibility of medial access is unclear. Anterior lesions can be challenging, as access can be difficult in the periareolar region. Once the patient is positioned, the operator should use the distances from the nipple as measured on the diagnostic MRI, as well as anatomic landmarks (such as a prior lumpectomy or biopsy scar on the skin) to estimate whether the lesion will be within the positioning device prior to image acquisition.
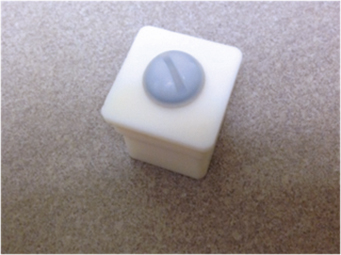
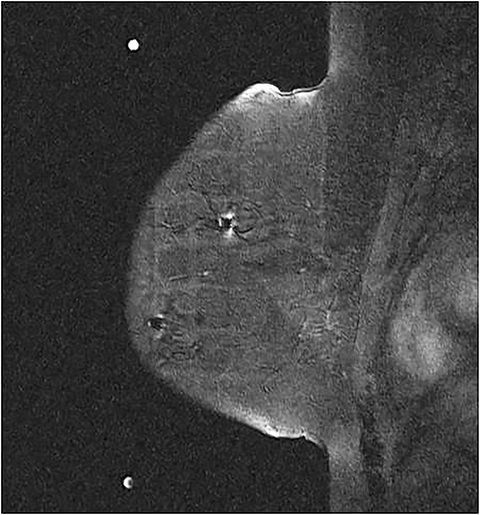
A fiducial marker, which is visible on T1-weighted sequences, helps to make finding the lesion for targeting (Figure 3) easier. Many grids have standard locations for the fiducials; for those that don’t, the operator should try to avoid placing the fiducial at the biopsy site. Bilateral fiducials should be placed for bilateral biopsies. If the access is not yet determined and medial and lateral grids are placed, then fiducials should be placed within each grid.
The procedural MRI protocol should consist of pre- and postcontrast T1-weighted, fat-saturated sequences in the axial and sagittal planes. If the lesion is believed to not be accessible on the precontrast examination, the patient should be repositioned before intravenous administration of a gadolinium-based contrast agent (GBCA). Per the ACR, GBCAs should be administered intravenously as a bolus with standard dosing by weight of 0.1 mmol/kg followed by a saline flush of at least 10 ml.7
Equipment and lesion targeting
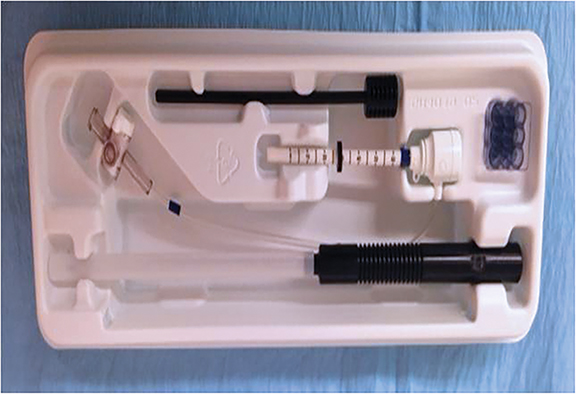
When preparing for the biopsy, speed and organization are paramount. Real-time access to the diagnostic MRI images allows the operator to quickly check lesion location and regional landmarks. A prepared biopsy tray should be easily accessible. The essentials of an MRI-guided biopsy kit consist of a coaxial system that is MR-compatible; a plastic introducer sheath with depth gradation, and a mobile depth marker. The inner component is either a metallic, sharp, introducer stylet or an interchangeable plastic obturator (Figure 4). With a grid system, a needle guide, composed of multiple short tunnels is used to keep the system parallel to the chest wall. The guide snugly fits into one of the squares in the grid, and the coaxial system fits into one of the tunnels in the needle guide (Figure 5).8
The operator should understand the type of the needle being used. Elements to note include the needle gauge and size of the tissue-receiving aperture device. It is important to know if the tip is a beveled edge or blunt, as the latter may be more optimal for sampling superficial areas, or anterior areas near the areola.
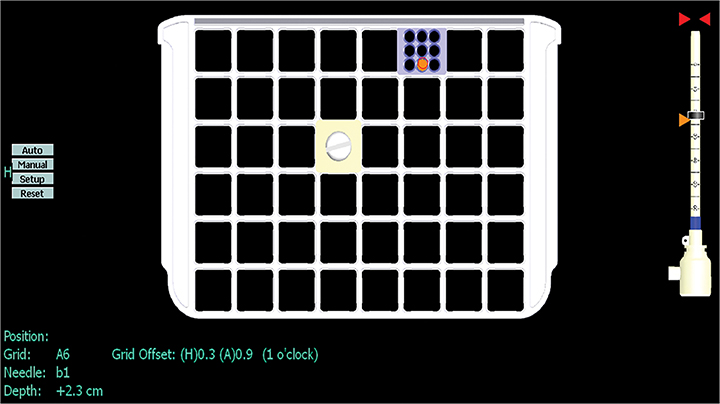
The images are sent to a workstation where computer-aided detection localization software can be utilized; the T1 hyperintense fuducial marker is needed for orientation. The coil, side and biopsy device will then be selected. Crosshairs will be placed on the lesion in both the sagittal and axial plane and then the location and depth are calculated. For a grid system, the particular square to access and the exact hole within the needle guide is calculated (Figure 6).8
Manual localization can also be performed for a grid system utilizing the axial and sagittal imaging. It is important to know how to perform manual localization in case the CAD localization software malfunctions. Calculate the estimated depth from the sagittal images by multiplying the number of slices from the skin surface to the lesion by the slice thickness. By placing a cursor over the lesion in the sagittal plane and scrolling back to the grid, the appropriate square within the grid and the appropriate tunnel within the needle guide can be determined. The lesion location relative to the fiducial is helpful for localization. If axial imaging is used, the depth of the lesion to the skin should be calculated, but it important to remember that the 2 cm of thickness of the needle block should be also considered in the calculation.11
Procedure
Once a biopsy target has been identified, the biopsy can be started. Protective eyewear for the operator should be considered. The biopsy area is first cleaned with appropriate sterile technique. 1% lidocaine can be used for the skin with 1% lidocaine with epinephrine used for deeper tissue, unless there are contraindications to the use of epinephrine. The operator should remember to check for bubbles in the syringe, as this can cause artifact on the MRI images.8
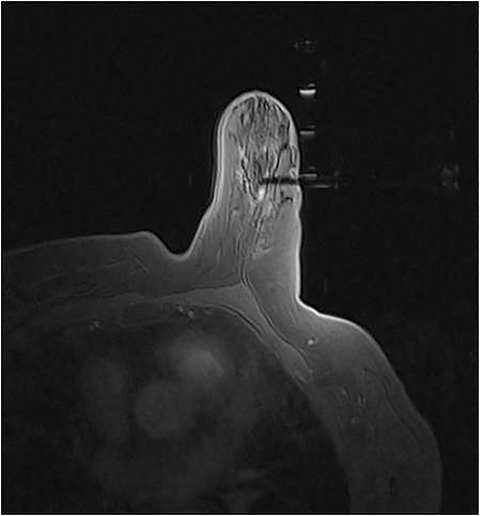
The coaxial system is then positioned and advanced to the desired depth, using the metallic cutting stylet as the inner compartment of the coaxial system. A scalpel can be used to make an incision prior to advancing the metallic cutting stylet. At our institution, we usually do not use a scalpel unless there is significant skin tenting. A push-twist motion during insertion of the stylet, as well as a liberal dose of anesthetic early in the procedure, may decrease the possibility of snow-plowing.8 Once at the appropriate depth, the cutting stylet can be exchanged for the obturator. Image acquisitions in both the axial and sagittal plan are obtained. The optimal position of the tip of the obturator is at the center of the lesion (Figure 7). If the tip is at the biopsy location but not centered, directional sampling can be performed. Note: The clock face in an MRI-guided biopsy is relative to the grid.12 If the patient is oriented head first in the MRI scanner, the 12 o’clock position is towards the chest wall, 6 o’clock is towards the nipple, 3 o’clock toward the patient’s head and 9 o’clock toward the patient’s feet. If the obturator is anterior to the lesion on the sagittal plane, the operator would want to obtain most samples with the aperture directed toward the patient’s chest wall, or centered at the 12 o’clock position (Figure 8) with samples between the 9 o’clock and 3 o’clock positions (clockwise).
The vacuum-assisted biopsy is a very effective sampling device for MRI.9 Note that the vacuum console is not MR-compatible, and that only the foot-pedal and biopsy driver can be brought into the MRI suite.11 Beginning with six samples is reasonable. Axial and sagittal post-biopsy sequences can be used to determine if additional samples are necessary. The samples should be inspected by the operator to determine if fibroglandular tissue is present. Once the samples are deemed adequate, an MR-compatible biopsy-marking clip should be placed. Additional images after clip placement can be obtained; however, post-biopsy changes limit visualization of the clip. At our institution post-clip MRI images are not usually obtained.
Procedural efficiency is imperative as lesions may washout, making them difficult to identify on more delayed sequences. A reasonable estimate for an MRI biopsy is 20-30 minutes; longer times may prevent adequate lesion visualization. Additionally, the longer the time, the more the patient is prone to move, potentially compromising the biopsy.
When sampling more than one lesion, the calculations for all lesions should be done at the same time. If possible, the obturators should be placed prior to the next imaging. The more suspicious lesion, which washes out first, should be biopsied first.
In cases of lesion non-visualization, delayed postcontrast images should be obtained in both the axial and sagittal planes. Subtraction imaging and reduction in compression can facilitate lesion visualization.8 If the lesion is not identified, and the biopsy is canceled, then short-term follow up MRI is recommended.13
The steps are similar for MRI-guided localization with the exception of additional equipment, including MR- compatible needle localization wires (single or double hook) and a specific block for the needle localization wire (Figure 9). The lesion is identified and a hollow needle with a loaded wire is placed at the targeted depth. The position is confirmed and the wire is deployed into the lesion. The wire location can be evaluated on MRI sequences, seen as a linear susceptibility artifact. As with localizations in other modalities, the wire is then secured in place on the skin to prevent displacement.14
Compression should be administered as soon as the biopsy system and grid are removed to minimize hematoma formation. This compression should be maintained as the patient transitions onto the cart from the prone to supine position. Appropriate compression should be applied for at least 10-15 minutes. A post-biopsy mammogram is performed. If a hematoma has formed and the patient does not have a supportive bra, an ACE bandage can be considered.
Radiology-pathology concordance
Studies have shown higher discordance rates in MRI-guided biopsies compared with stereotactically or sonographically guided biopsies (7% and 3%, respectively). It is thought that this may be due to missed targets in some cases. It is often difficult to confirm appropriate lesion sampling on the post-procedural MRI secondary to target washout and post-biopsy changes. In addition, the lesions only enhance in vivo, making it difficult to confirm the target within the specimen.15 Thus, accurate identification of the target early in the procedure is of upmost importance for confident pathology concordance. Careful radiologic-pathology correlation is necessary, perhaps in a multidisciplinary setting if available. Short-term interval follow-up MRI has been described in the literature and can be considered in the setting of benign concordant biopsies.12
Conclusion
Being able to successfully perform MRI-guided interventions is integral to a breast imaging program. Diligence in preparation, positioning and prebiopsy targeting are imperative for adequate sampling and radiology-pathology concordance. Speed and precision are keys to success. An organized biopsy tray, as well as familiarity with the equipment and the techniques outlined in this article, can help with a safe and efficient procedure.
References
- Kuhl CK, Schrading S, Leutner CC, et al. Mammography, breast ultrasound, and magnetic resonance imaging for surveillance of women at high familial risk for breast cancer. J Clin Oncol. 2005;23(33):8469-8476.
- Orel SG, Rosen M, Mies C, et al. MR imaging-guided 9-gauge vacuum-assisted core-needle breast biopsy: initial experience. Radiology. 2006;238 (1):54-61.
- Leung JW. Utility of second-look ultrasound in the evaluation of MRI-detected breast lesions. Semin Roentgenol. 2011; 46(4):260-274.
- Leung JW. Second-look ultrasound: only for biopsy or more? Eur J Radiol. 2012; 81 Suppl 1:S87-89.
- LaTrenta LR, Menell JH, Morris EA, et al. Breast lesions detected with MR imaging: utility and histopathologic importance of identification with US. Radiology. 2003 ;227(3):856-861.
- Spick C, Baltzer PA. Diagnostic utility of second-look US for breast lesions identified at MR imaging: systematic review and meta-analysis. Radiology. 2014;273(2):401-409.
- Warner E, Plewes DB, Shumak RS, et al. ACR Practice Guideline for the Performance of Magnetic Resonance Imaging-Guided Breast Interventional Procedures. Available at http://www.acr.org/~/media/FFD2D1CA57ED479DBB6DD0DA0D9E3 A87. pdf2011. American College of Radiology. Accessed September 15, 2014.
- Price ER. Magnetic resonance imaging-guided biopsy of the breast: fundamentals and finer points. Magn Reson Imaging Clin N Am. 2013;21(3):571-581.
- Lehman CD, Deperi ER, Peacock S, et al. Clinical experience with MRI-guided vacuum-assisted breast biopsy. AJR Am J Roentgenol. 2005;184 (6):1782-1787.
- Ojeda-Fournier H, Mahoney MC. MR-guided breast interventions: pearls and pitfalls. Part 1. Appl Radiol. 2011; 40 (3)18-25.
- Ojeda-Fournier H, Mahoney MC. MR-guided breast interventions: pearls and pitfalls. Part 2. Appl Radiol. 2011; 40 (10): 16-22.
- Price, ER, Morris EA. Magnetic resonance imaging-guided breast biopsies: tips and tricks. Can Assoc Radiol J. 2011; 62(1):15-21.
- Niell, BL, Lee JM, Johansen C, et al. Patient outcomes in canceled MRI-guided breast biopsies. AJR Am J Roetgenol. 2014; 202(1) 223-228.
- Zebic-Sinkovec M, Hertl K, Kadivec M, et al. Outcome of MRI-guided vacuum-assisted breast biopsy - initial experience at Institute of Oncology Ljubljana, Slovenia. Radiol Oncol. 2012; 46(2):97-105.
- Lee JM, Kaplan JB, Murray MP, et al. Imaging histologic discordance at MRI-guided 9-gauge vacuum-assisted breast biopsy. AJR Am J Roentgenol. 2007; 189(4):852-859.
Citation
Bhole S, Neuschler E. MRI-guided breast interventions. Appl Radiol. 2015;(10):7-13.
October 3, 2015